Battery switch on travel trailer function is crucial for managing power and preventing electrical issues. Understanding how these switches work, from their various types (single-pole, double-pole, etc.) to their proper wiring and installation, is key to a smooth and safe RV experience. This guide will walk you through everything you need to know, from basic functionality to troubleshooting and maintenance.
We’ll explore different battery switch configurations, comparing their pros and cons for various setups, including multiple batteries and solar panel integration. Learn how to select the right switch for your needs, safely install it, and maintain it to prevent costly repairs and ensure your travel trailer’s electrical system runs flawlessly.
Types of Battery Switches in Travel Trailers

Choosing the right battery switch for your travel trailer is crucial for managing your power sources and protecting your electrical system. Different types offer varying levels of control and complexity, impacting both cost and installation. Understanding these differences will help you make an informed decision.
Travel trailers typically use battery switches to isolate and control the flow of power from your house batteries (used for interior lights, appliances, etc.) and your chassis battery (used for starting the tow vehicle). This allows you to disconnect your house batteries to prevent drain when the trailer isn’t in use, while still maintaining power to the chassis battery.
So, you’re an audiophile who travels? Awesome! Check out this guide on creating the perfect audiophile travel setup to keep your ears happy on the go. Remember to also sort out your travel insurance before you leave; getting Aon travel insurance is a smart move to protect your gear and yourself. That way, you can relax and enjoy your trip, knowing your valuable audio equipment is covered if anything goes wrong.
Happy travels!
Single-Pole Battery Switches
Single-pole switches are the simplest type. They offer a single on/off function, typically controlling the connection between your house batteries and the trailer’s electrical system. This means you can either completely connect or disconnect the house batteries. They are inexpensive and easy to install, making them a popular choice for basic setups. However, they lack the flexibility of more advanced switches.
A single-pole switch can only handle one circuit at a time.
Double-Pole Battery Switches
Double-pole switches provide more control by independently managing two circuits. This is particularly useful in setups with two battery banks or when you need to isolate specific components of your trailer’s electrical system. They offer greater flexibility compared to single-pole switches, allowing for more precise management of power. However, they are slightly more complex to install and usually more expensive.
Double-Pole Double-Throw (DPDT) Battery Switches, Battery switch on travel trailer function
DPDT switches are the most sophisticated type. They allow you to switch between multiple power sources, such as connecting to shore power, your house batteries, or both simultaneously. This is a great option for those who frequently use shore power and want the ability to easily switch between sources or charge their batteries from different sources. They are the most expensive and require more advanced installation knowledge.
Comparison of Battery Switch Types
| Feature | Single-Pole | Double-Pole | Double-Pole Double-Throw (DPDT) |
|---|---|---|---|
| Number of Circuits Controlled | One | Two | Two, with switching between sources |
| Complexity | Low | Medium | High |
| Cost | Low | Medium | High |
| Installation Difficulty | Easy | Moderate | Difficult |
| Flexibility | Low | Medium | High |
Function and Purpose of Battery Switches
A battery switch in your travel trailer acts as the central control for your electrical system, allowing you to manage power flow from different sources and protect your valuable equipment. It’s a crucial component for safely and efficiently using your trailer’s batteries.Battery switches primarily manage power distribution between your house batteries (powering interior lights, appliances, and other systems) and your chassis battery (powering the vehicle’s essential systems like the engine, lights, and brakes).
So, you’re an audiophile who travels? Awesome! Check out this guide on audiophile travel setups to make sure your ears are happy on the go. It’s crucial to protect your investment, right? That’s where good travel insurance comes in. Consider getting a policy from Aon travel insurance for peace of mind knowing your gear is covered if anything goes wrong.
Happy travels and happy listening!
This separation is essential for preventing unwanted drain on either battery and ensures each system has the power it needs. For example, you wouldn’t want your house battery draining while the trailer is stored, nor would you want your house systems running down your truck’s battery.
Battery Switch Power Management
A properly functioning battery switch allows you to select which batteries are connected to the trailer’s electrical system and which are isolated. This is usually accomplished through various switch positions, often labeled “Both,” “House,” “Off,” and “Chassis.” The “Both” position connects both batteries to the trailer’s system, providing maximum power. “House” connects only the house batteries, allowing you to use your trailer’s interior systems while disconnecting the chassis battery to prevent draining it.
“Chassis” connects only the chassis battery, typically used for starting the vehicle. The “Off” position completely disconnects both batteries, preventing any power drain and minimizing the risk of short circuits.
Safety Aspects of Battery Switches
Battery switches play a critical role in preventing accidental drain and short circuits. By isolating batteries when not in use, they significantly reduce the risk of a completely drained battery, which can lead to costly repairs or replacements. The “Off” position is particularly important for long-term storage, ensuring that neither battery is inadvertently drained over time. Furthermore, the switch itself helps prevent accidental short circuits by providing a controlled and safe way to connect and disconnect batteries.
Incorrect wiring or loose connections can cause dangerous short circuits, which the switch helps mitigate. Regular inspection of the switch and its connections is vital for maintaining safety and preventing potential problems.
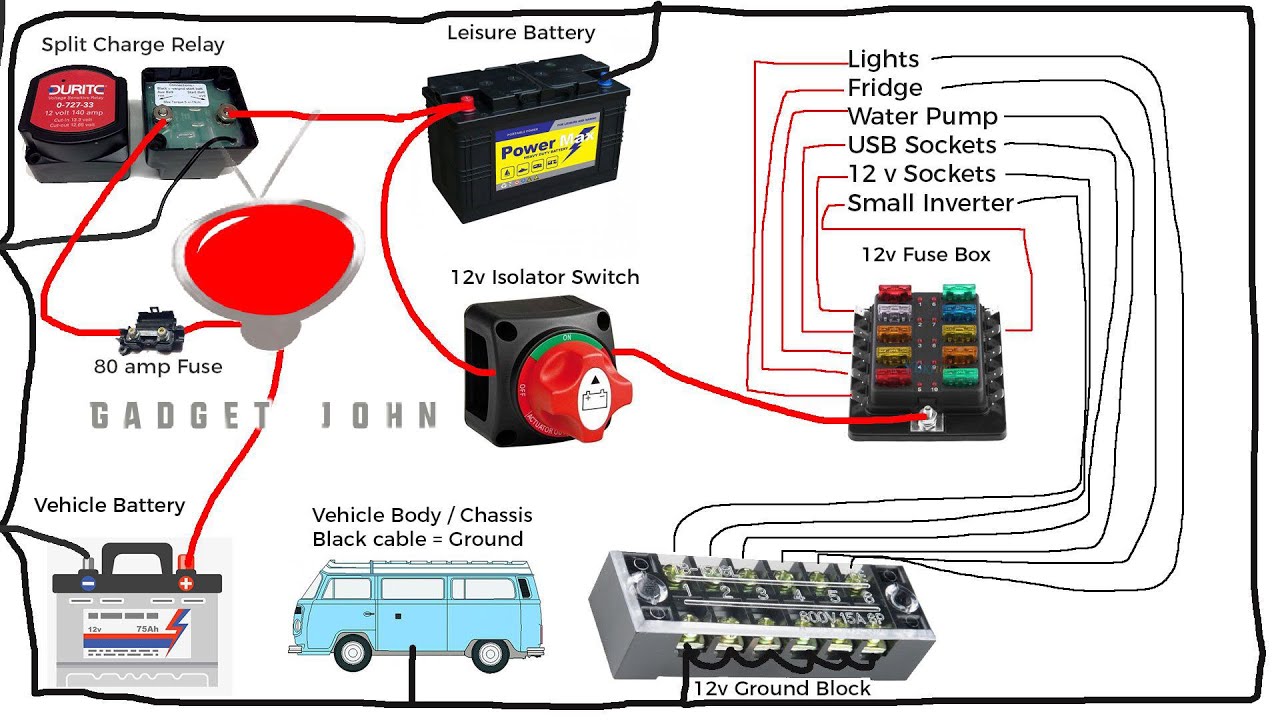
Wiring and Installation of Battery Switches
Installing a battery switch in your travel trailer is a crucial step in managing your power system. It allows you to isolate your house batteries from the charging system and other circuits, preventing accidental drain and improving safety. This section will guide you through the process, providing a clear understanding of the wiring and installation steps.
Simple Wiring Diagram for a Typical Travel Trailer Battery Switch Setup
A typical setup involves two batteries connected to a battery switch, which then connects to the trailer’s 12V system. This allows you to switch between using one battery, both batteries, or neither.
Imagine a diagram: Two battery terminals (Battery 1 Negative (-) and Battery 2 Negative (-)) are connected to the negative bus bar of the battery switch. The positive terminals (Battery 1 Positive (+) and Battery 2 Positive (+)) each have a wire leading to the corresponding positive input terminal on the battery switch. The switch’s output positive terminal (+) then feeds to the positive bus bar of your trailer’s 12V system.
The negative terminal of the trailer’s 12V system connects directly to the chassis ground. This configuration allows you to select which battery (or both) powers your trailer’s systems.
Step-by-Step Guide to Installing a Battery Switch
Proper installation is vital for safety and functionality. Before you begin, always disconnect your batteries’ negative terminals to prevent accidental shorts or shocks.
- Gather Necessary Tools and Materials:
- Battery switch (appropriate amperage for your system)
- Appropriate gauge wiring (refer to the switch’s specifications)
- Wire connectors (crimp-on style are recommended)
- Wire strippers/cutters
- Crimping tool
- Screwdrivers (Phillips and flathead)
- Wrench (for battery terminals)
- Electrical tape
- Safety glasses
- Gloves
- Prepare the Wiring: Strip the ends of your wires according to the wire connectors’ specifications. Ensure clean, consistent stripping to ensure a good connection. Crimp the connectors securely onto the wires.
- Mount the Battery Switch: Choose a secure, dry location for the switch, easily accessible but protected from the elements. Use appropriate mounting hardware.
- Connect the Batteries: Connect the positive and negative wires from each battery to the corresponding terminals on the battery switch. Double-check your connections before proceeding.
- Connect to the Trailer’s 12V System: Connect the output terminal of the battery switch to the positive bus bar of your trailer’s 12V system. Connect the negative terminal of the 12V system to the chassis ground.
- Test the System: Reconnect your battery’s negative terminals. Carefully test the system by turning the switch to different positions and checking the functionality of your trailer’s 12V appliances.
- Secure Wiring: Neatly secure all wires and connections using zip ties or similar fasteners to prevent accidental damage or short circuits.
Always double-check your wiring before connecting the batteries. Incorrect wiring can lead to serious damage or injury.
Maintaining and Replacing Battery Switches: Battery Switch On Travel Trailer Function
Keeping your travel trailer’s battery switch in good working order is crucial for reliable power. Regular maintenance prevents problems and extends the lifespan of your switch, saving you time and money in the long run. Neglecting maintenance can lead to corrosion, poor connections, and ultimately, switch failure.Regular inspections and timely replacements are key to ensuring your battery system functions correctly.
This section details a practical maintenance schedule and a step-by-step guide for replacing a faulty switch.
Battery Switch Maintenance Schedule
A simple maintenance schedule can significantly extend the life of your battery switch. This involves regular visual inspections and occasional cleaning. Ignoring these steps can lead to premature failure due to corrosion and build-up.
- Monthly Inspection: Visually inspect the switch for any signs of corrosion, loose connections, or damage to the casing. Check the surrounding wiring for any signs of fraying or damage.
- Quarterly Cleaning: Use a wire brush or sandpaper to carefully clean any corrosion from the switch terminals and connection points. Apply a thin layer of dielectric grease to the terminals after cleaning to prevent future corrosion.
- Annual Deep Clean: For a more thorough cleaning, disconnect the battery switch from the battery and wiring. Use a suitable cleaning agent (following manufacturer instructions) to clean the switch thoroughly. Inspect the switch mechanism for any signs of wear and tear. Re-apply dielectric grease to all connection points.
Replacing a Faulty Battery Switch
Replacing a battery switch is a relatively straightforward process, but requires careful attention to safety and proper procedures. Before starting, always disconnect the negative battery cable to prevent accidental short circuits.Selecting the correct replacement is essential. Note the amperage rating and any other specifications of your existing switch before purchasing a replacement. Improper replacement could lead to system failure or even fire hazards.
Dispose of the old switch responsibly, following local recycling regulations for electronic waste.
Replacing a Battery Switch: A Step-by-Step Guide
Imagine your battery switch is mounted on a panel inside your travel trailer.
1. Disconnection
First, disconnect the negative battery cable from the battery. Then, disconnect all wires from the battery switch. Take note of which wire goes to which terminal to avoid confusion during reinstallation. Use a camera to photograph the wiring configuration if needed.
2. Removal
Carefully remove the mounting screws securing the switch to the panel. Gently remove the old battery switch. If the switch is difficult to remove, carefully inspect for any obstructions.
3. Installation
Position the new battery switch in place. Secure it using the appropriate screws.
4. Wiring
Connect the wires to the new battery switch, ensuring each wire is connected to the correct terminal. Refer to the wiring diagram (if available) or your photograph.
5. Connection
Reconnect the negative battery cable to the battery.
6. Testing
Turn the battery switch on and off to verify its functionality. Check the battery voltage to ensure the system is operating correctly.
Mastering your travel trailer’s battery switch is a simple yet powerful step towards confident RV ownership. By understanding its function, proper installation, and common troubleshooting techniques, you can avoid frustrating power outages and ensure a consistently enjoyable camping experience. Remember regular maintenance and safe practices are key to a long-lasting and reliable system. Happy travels!
Q&A
What happens if my battery switch is faulty?
A faulty switch can lead to no power, intermittent power, or even overheating. It might also cause accidental battery drain or short circuits.
How often should I inspect my battery switch?
Ideally, inspect your battery switch at least once a year, or more frequently if you use your travel trailer often.
Can I install a battery switch myself?
While possible, it’s recommended to have some basic electrical knowledge or seek professional help for installation, especially if you’re not comfortable working with 12V systems.
What size wire should I use with my battery switch?
The appropriate wire gauge depends on the amperage rating of your battery switch and the length of the wiring run. Consult the switch’s specifications and use appropriately sized wire to prevent overheating.
